
Before digging a backyard pond, work out what it will be used for, roughly how much water it will hold, how you will filter it, whether you want a waterfall or stream, and what equipment and materials you need.
These five decisions help you plan a pond that suits your budget and is easier to maintain.
Digging a hole is hard enough. You don’t want to finish the pond and discover the filter is too small, the waterfall needs more flow, or the liner won’t quite reach.
I like natural-looking ponds, clean water and as little maintenance as possible. I also like keeping costs down. For me, that starts with a basic plan before I pick up a shovel or buy a pump.
Here are the five things I’d work through when planning a DIY backyard pond.
You can also watch the video where I explain these five pond-planning decisions.
1. Decide what you want the pond for
The pond’s purpose influences its size, depth, filtration and layout. A wildlife pond with no fish has very different demands from a pond containing koi, turtles or ducks.
Even a pond without fish collects leaves, dust and other organic material. Once you add animals and feed them, you also need to account for the waste they produce.
Before choosing equipment, ask yourself:
Will this be a wildlife pond, fish pond, duck pond or somewhere to swim?
What animals will live in it, and how much room will they need?
Do I want a formal pond or a more natural appearance?
How clear do I want the water, and how much maintenance am I willing to do?
Large fish need swimming space. Smaller fish benefit from places to hide. If you want to swim, the depth and layout need to suit that use too.
The basic principles of filtration remain similar, but the amount of filtration and water movement changes with the pond’s use. Getting clear on that first makes the next decisions much easier.
2. Estimate how much water the pond will hold
You need an approximate pond volume before sizing the filter and planning the flow. I size my DIY filters around both the amount of water and the animals I’m keeping.
For a rectangular pond, the basic calculation is:
Length × width × average water depth = volume
With measurements in metres, multiply the result by 1,000 to get litres. With measurements in feet, multiply by approximately 7.48 to get US gallons.
How I estimate an irregular pond
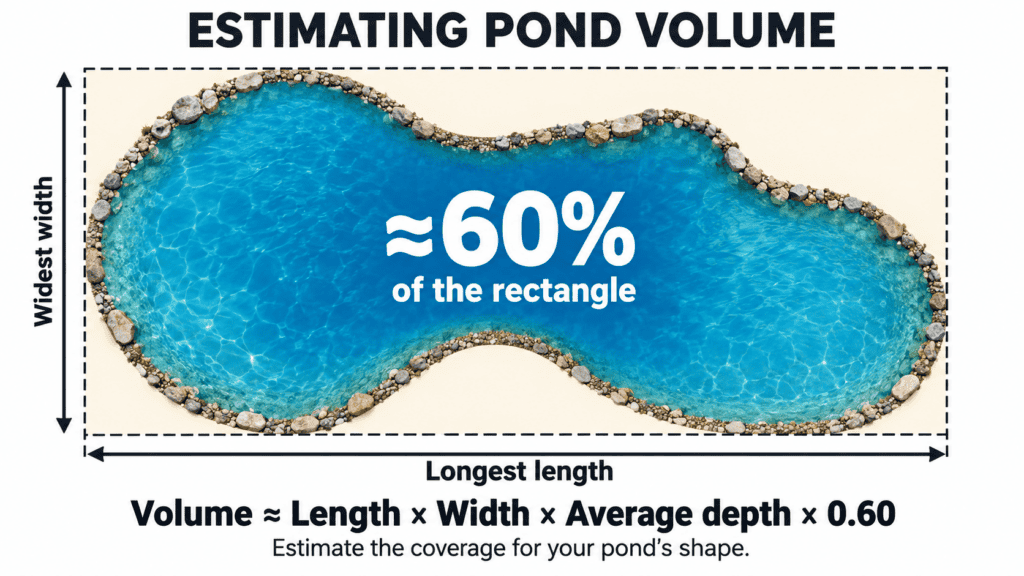
Most of my ponds aren’t neat rectangles. To estimate the volume, I imagine the pond shape inside a rectangle and work out roughly how much of that rectangle it fills.
If the pond occupies about 60% of the rectangle, I multiply the rectangle’s length and width by 0.6. That gives me an approximate surface area, which I then multiply by the average water depth.
For example, imagine a pond inside a 4 m × 3 m rectangle, filling about 60% of that area, with an average water depth of 0.6 m:
4 × 3 × 0.6 × 0.6 × 1,000 = 4,320 litres
That is approximately 1,140 US gallons. The first 0.6 represents the shape; the second is the average depth in metres. The 60% figure is just an example, so use an estimate that matches your own pond.
If you want you can use the volume calculator.
Use average depth for water volume
If the pond has shelves and deeper sections, using its maximum depth will overestimate the amount of water. Your average needs to reflect how much of the pond is shallow and how much is deep.
Use the intended water depth, rather than assuming the excavation will be filled to the top. Rock and pebble will displace some water too.
At this stage, a sensible estimate is enough to keep planning. You can refine the numbers as the design takes shape.
3. Choose a filtration system you can maintain
A pond filtration system needs to deal with solid waste and provide somewhere for beneficial bacteria to live. Those bacteria help process dissolved waste, while trapped solids need a way out of the system.
There are plenty of ways to achieve this. The useful question is whether the filter suits your pond’s waste load and how easily you can clean it.
A small canister filter might be fine for one pond and a constant cleaning job on another. Put it on a heavily stocked duck pond and you could spend far more time maintaining it than enjoying the pond.
Why I use bog filters
For the natural-looking ponds I build, I usually prefer a bog filter, also called a wetland or planted filter.
Rock and pebble provide surfaces for bacteria to grow on, plants take up nutrients, and the filter captures solid waste. I design the filter so I can flush out that accumulated muck.
Most of my bog filters only get flushed every year or two. That is my experience with my own systems, rather than a cleaning schedule for every pond. The amount of waste and the way the filter is built both matter.
If you’re considering this approach, my guide to building a bog filter explains the main design features.
Plan how water reaches the pump
I also like incorporating a skimming system with a protected place for the pump. It draws floating debris towards a collection area and helps keep larger particles from clogging the pump.
This keeps the surface looking cleaner and reduces the amount of material that sinks into the pond. Some will still sink, but collecting it at the surface makes life easier.
A skimming system isn’t the only option. A solids-handling pump can sit in the pond and send suitable solid waste directly to the filter. Choose the pump type to match the system you intend to build.
Before digging, allow enough room for the filter, its plumbing and access for cleaning. Think through where water enters the system and how it returns to the pond.
4. Plan your waterfalls and streams
A wide waterfall generally needs more flow than a gentle creek. Decide what effect you want before choosing a pump, because the filter’s flow requirement may not give you the waterfall you have in mind.
In many of my ponds, water is pumped from the skimming system into the bog filter. It then overflows into a stream or waterfall and returns to the pond. This connects the components in a way that looks natural.
Streams and waterfalls can help aerate the water. Even with those features, I often add extra aeration because it benefits the fish and the bacteria supporting the pond.
One pump or several pumps
Either can work. You can use a larger pump and divide its flow between different features, or use separate pumps for different jobs.
My courtyard pond runs on one pump. My larger dream pond has four: one for each of its two bog filters, one for the stream and one for the circulation jets.
I find separate pumps easier to manage on that pond. It doesn’t mean every pond needs four pumps.
Work out the flow each part needs, then choose a layout that supplies it. If the waterfall needs extra water, you can provide that separately or split the flow instead of sending it all through the bog.
Remember that a pump’s advertised maximum flow won’t necessarily be its actual flow once it is pushing water uphill and through pipework. My article on running multiple pond features from one pump explains flow control and pump selection in more detail.
5. Work out your materials and budget
Once you know the approximate volume, filtration system and flow requirements, you can make a useful materials list and start comparing costs.
For my style of pond, the big items are the liner, pumps, plumbing, rock and pebble. I also allow for the filter, protective underlayment and any extra aeration.
This is the point where you can decide whether to change the pond’s size, simplify a stream or build in stages. Changing a sketch is much easier than changing a finished pond.
Estimate liner costs before digging and check the final size
A liner estimate helps you set the budget. On small, straightforward ponds, I’m comfortable ordering liner before digging. On more elaborate builds, I prefer to excavate first and measure the finished shape.
I use a rope or string laid loosely through the excavation along the longest and widest sections. It needs to follow the contours, including the shelves and deepest parts, with extra material allowed around the edges.
The average depth used for pond volume is not the depth to use for sizing liner. The liner has to reach through the deepest parts and cover the actual shape of the excavation.
I use EPDM rubber for my own rock-lined ponds because it is flexible, durable and repairable. Other options exist, but liner is a major expense on my builds, so I want to get it right.
You can explore the pond equipment and materials I use once you know what your design needs.
Your checklist before digging
Before starting the excavation, you should be able to answer these five questions:
Purpose: What will the pond be used for, and what will live in it?
Volume: Roughly how much water will it hold at the intended water level?
Filtration: How will waste be captured, processed and removed?
Water movement: What flow will the filter, waterfall, stream or jets need?
Materials: What liner, pumps, plumbing and other materials will you need, and what will they cost?
If you’d like help figuring all this out my blueprint and private community can help.
Common backyard pond planning questions
Should I buy the pond pump before digging
Work out the pond’s filtration and water-feature requirements before choosing a pump. You can buy it before digging once the plan is clear, but buying one first and designing everything around it can limit your options.
Does every backyard pond need a bog filter
No. A bog filter is my preferred approach for many of my natural-looking ponds, but other filtration systems can work. Choose a system that suits the pond’s purpose, waste load, available space and maintenance needs.
Can a waterfall provide all the aeration a pond needs
It can contribute, but having a waterfall doesn’t automatically mean the pond has enough oxygen. I often use additional aeration even on ponds with streams and waterfalls.
How can I keep a DIY pond affordable
Plan the whole system before buying equipment. Estimate the volume, match the filtration to the pond’s use, work out the flow requirements and price the main materials. That gives you a chance to simplify the design before committing to expensive purchases.
Plan your pond using the same system I use
If you like my ponds and want the formulas, diagrams and build videos together in one place, have a look at the Pond Building Blueprint.
It walks through how I size and plan my ponds, with the pond ecology guide, Virtual Kev to help with planning and calculations, and access to our private community of DIY pond builders.
The community is also a useful place to share your plan and ask about materials or equipment available where you live.
The aim is to help you build a pond you enjoy looking after, without spending a fortune.
About to build a pond… or already have one?
Sign up for my email list and I’ll send you DIY-friendly pond tips, along with a few helpful tools like calculators, gear recommendations, and more.