
Sometimes it just isn’t possible to get electricity to where you need it. Recently I decided to build a pond and a stream using only solar power. Before taking on this project I had set up many ponds and streams, but never any that run solely on solar.
I have a good understanding of how to filter water, however the entire setup of the solar system was completely new to me. So, I thought I would write a post on how a total beginner set up a solar system, with battery back-up to run a DIY water feature.
Throughout the post I will link to products and videos that show how things were put together. So lets start with the filter.
Building Your Own Solar-Powered Pond Filter
Building your own pond filter is simpler than you might think. In this section I’ll show you how I built a simple DIY filter for my solar powered pond and stream.
When building any type of pond filter I have 3 simple rules:
- Make it easy to clean: This will save you a lot of hassle down the line.
- Size it correctly for your pond: Ensuring your filter matches the scale of your pond is crucial for optimal performance. This basically means having enough biological media to provide enough good bacteria for healthy water.
- Prevent siphoning back into the pond: You don’t want dirty water draining back into the pond if your pump shuts off.
These principles are important for any pond filter design. As this pond is going to be powered by solar energy, meaning the pump may not always be running, the siphon prevention is especially important.
If you are unsure about why bacteria is important I encourage you to read this article and watch the accompanying videos. It will quickly give you a broad overview on how the biological processes work inside a pond.
You might also be interested in the formulas I use when I build my ponds.
Materials and Tools
Here’s what I used for this DIY pond filter:
- Container: A round container, approximately 70 liters (just under 20 gallons).
- Pipes and Fittings:
- 25mm (1 inch) pressure pipe (a couple of short pieces).
- 25mm (1 inch) elbow fittings (2 pieces, with a third added later).
- 25mm (1 inch) T-piece fitting.
- 90mm (3.5 inch) stormwater pipe (a short piece).
- 90mm (3.5 inch) end cap and a 90-degree elbow fitting.
- Other Materials:
- 90mm (3.5 inch) Uni-Seal.
- Small piece of shade cloth and a cable tie.
- Clay balls (for the filter media).
- Tools:
- Hacksaw.
- File.
- Drill with a hole saw (sized for the Uni-Seal).
- Trowel.
- 8mm drill bit.
Building the Filter
Step 1: Creating the Outlet
Start by drilling a hole at the top of the container for the Uni-Seal. This will serve as the outlet where filtered water exits into the stream.
Inserting the 90mm stormwater pipe into the Uni-Seal can be a challenge, so use a file to bevel the edges of the pipe and slightly widen the hole if needed.
Some grease or soapy water can also help ease the pipe into place. Once that’s done, attach the 90-degree elbow fitting to the pipe.
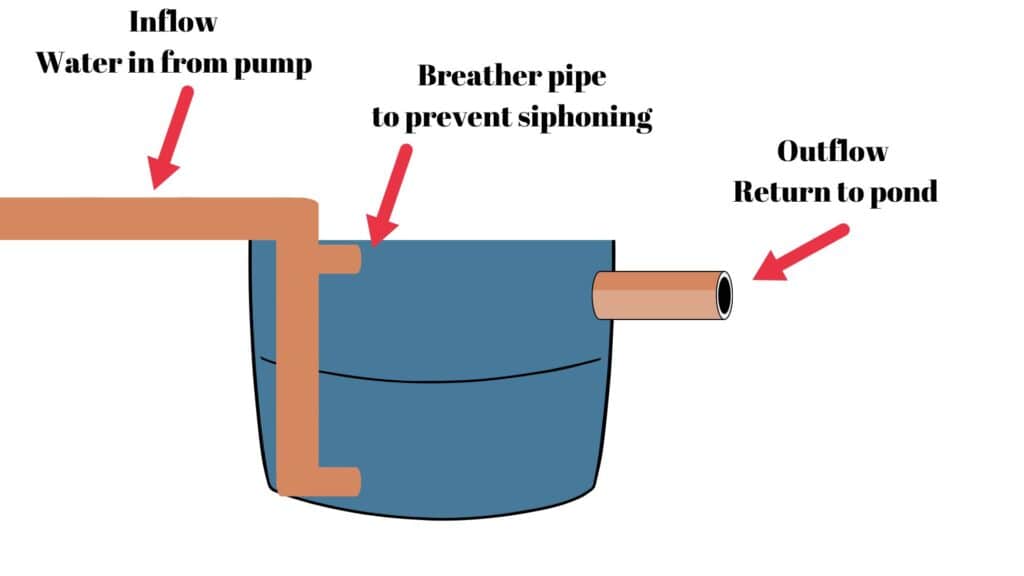
Step 2: Setting Up the Inflow
Water needs to be pumped into the base of the filter and then rise up through the media. To prevent the water from siphoning back into the pond when the pump shuts off, you’ll need to bring the inflow pipe over the top of the filter and add a breather pipe.
This breather pipe is crucial—it breaks the siphon when the pump is off, preventing the filter from draining back into the pond. I’ve tried using check valves in the past, but they tend to fail, so this breather pipe is a more reliable solution.
Step 3: Connecting the Plumbing
Connect an elbow fitting to the base of the filter and another at the top. The breather pipe should be positioned at about the water level inside the filter. I used a hacksaw to cut the 25mm pipe to the right size, ensuring it sits just on the edge of the filter. This will make it easier to hide later on with rocks and plants.
I’ve angled the bottom elbow fitting to create a swirling motion inside the filter. This helps solid materials settle at the bottom, allowing the clean water to rise up through the media.
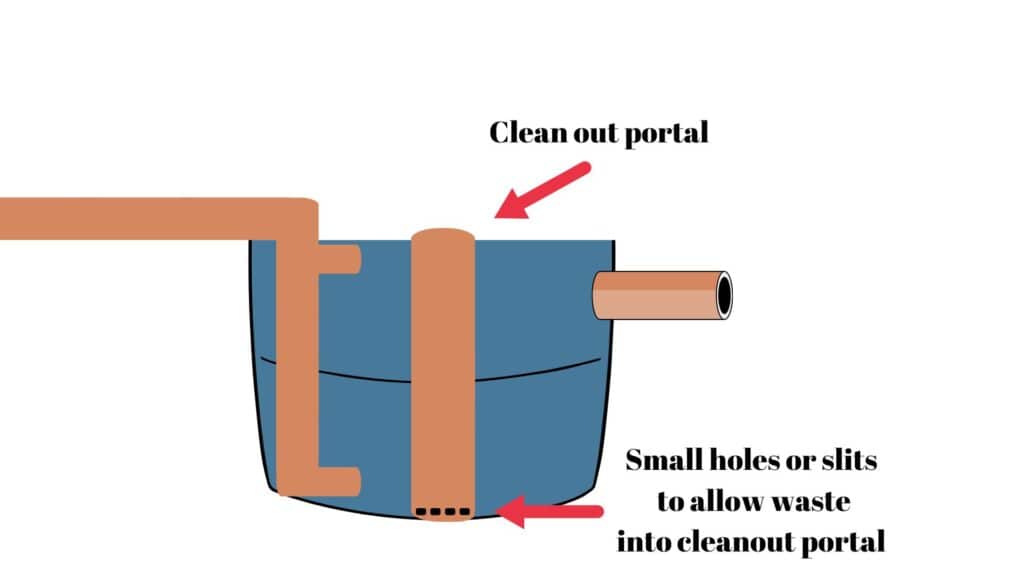
Step 4: Adding a Cleanout Portal
To remove solids from the bottom of the filter, I’ve added a cleanout portal using a piece of the 90mm pipe. I notched out slits in the pipe to allow dirty water to enter when it’s time to flush the filter.
On previous filters, I’ve used a cleanout point at the base, but since this filter will be hidden in a garden mound, I opted for a portal that allows me to use a pond vacuum to clean out the filter.
Step 5: Adding the Filter Media
For the filter media, I’m using aquaponic clay balls (Amazon link). These are porous, which allows for different oxygen zones to develop, promoting the growth of various beneficial bacteria. You can also use bio balls if you prefer; they’re inexpensive and work well in high-flow filters.
To keep the clay balls from floating away, I’ve covered the outflow with a small piece of shade cloth secured with a cable tie.
Final Touches to the Filter
Once the filter was assembled, I buried it in the mound that will form the garden and stream, using bricks and rocks to secure the inflow and cleanout portal. After filling it with clay balls, I made a final adjustment to the breather pipe to ensure it was positioned correctly.
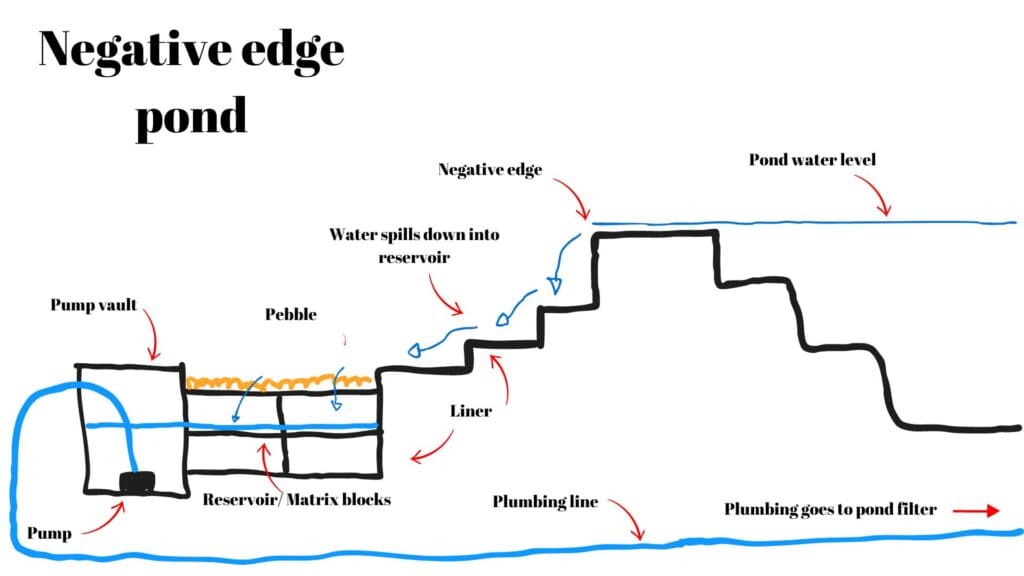
Negative edge
On this project I am using a negative edge. This is a water reservoir that the pond will overflow into, this allows me to store excess water, so I don’t need to worry about constantly topping up the pond.
In the video I linked at the top of the article, you will see how I dug it out and constructed it. But if you need more information or you would like to learn exactly how to size a negative edge for your project, read this article and watch the accompanying video.
Digging the Pond and Stream
With the filter in place it was time to dig out the pond area and the stream. I decided to have two streams, a main one on the right hand side and a smaller tributary on the left hand side.
In the garden area I want to plant impatiens and they do really well in streams, best of all if you plant them in a stream you don’t need to worry about watering them!
Whenever I dig out my ponds I create shelves that I can position rocks on. This allows me to create a natural look. The excavated dirt I use to shape the surrounding landscape and create banks that will keep the water in the stream zones.
Materials for the Pond and Stream
So the filter was in place, the pooling pond area was dug, and the water reservoir was installed. Here’s a rundown of the materials I used:
- EPDM Liner: For the reservoir, stream and pond.
- Assorted Rocks and Pebbles: I got one cubic meter to create the natural look I wanted.
- Flexible Pipe: I used a one-inch diameter flexible pipe to run water from the reservoir to the filter, which I had from a previous project.
Setup Process
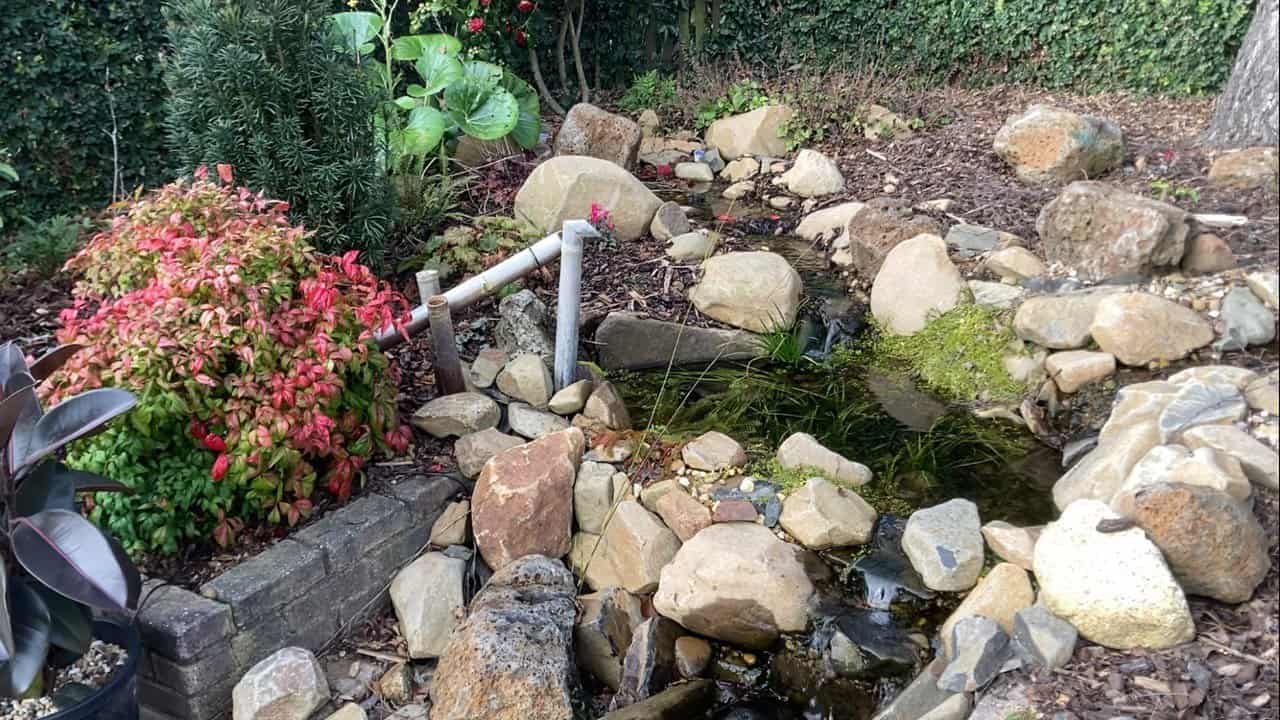
I enjoy the physical work of adding rocks to the pond area. It’s fun to envision how everything will look with water flowing through it. My approach is to avoid overthinking the placement—just basic ideas like hiding the filter and using large rocks to create twists and turns.
Tributary Stream and Pooling Area
To add more interest to the design, I created a small tributary stream using an old piece of liner. I used regular high-yield expandable foam (Amazon link) to direct the water over the rocks and into the reservoir. This foam is also helpful on small waterfalls where the streams enter the pooling/pond area.
Above the reservoir, I added a small pooling area with some leftover liner. This area creates a gentle stream before the water disappears back into the reservoir. While I made a bit of a mess with the foam (as I always do), once the plants and moss are added, it will blend in naturally.
I’m no artist, but I’ve already added a couple of plants to start with. While the feature was running, I trimmed the excess liner around the edges to clean up the appearance.
Solar Setup
Now for the part that I had little experience with—the solar setup. Initially, I planned to buy an off-the-shelf solar pump kit, but I decided it would be more beneficial to learn how to set up a solar system myself. Plus, those kits can be expensive and don’t always include a battery.
What I Used
- DC Sump Pump: I got a small, 5-amp pump from eBay for around $20-$30. It pumps about 4,200 litres per hour. This pump ended up failing after 4 months and I replaced it with a more reputable model.
- Solar Panel: I bought a 160-watt solar panel for about $100.
- Lithium-Ion Battery: I opted for a 100 amp-hour lithium-ion battery, which cost around $400. While a regular car battery would have been cheaper, I wanted something that would last for many years.
- Solar Charge Controller: These are pretty cheap—mine was about $20.
- Additional Components: I also needed a cable connection kit, mounting brackets, and fuses to make setup easier, which cost an extra $90.
I do have some links available to a complete solar panel/ battery system of you want to check that out. It can make the set up simpler.
Setting It Up
Setting up the solar system was surprisingly straightforward:
- Connect the Battery to the Solar Control Panel: There’s an icon on the controller for the battery. Connect the negative (black) terminal to the negative socket and the positive (red) terminal to the socket marked with a plus sign.
- Connect the Solar Panel: Again, follow the icons on the controller, connecting positive to positive and negative to negative.
- Connect the Pump: Connect the pump’s red wire to the positive terminal and the blue wire to the negative terminal.
I was relieved to see that the panel was charging the battery and the battery was powering the pump. Even though electricity can be intimidating, this setup was relatively easy.
With everything working it was time to tidy up and add some plants.
How it looked after adding some plants
Below is a video showing how I configured the solar on the controller and the plants I used in and around the pond. I was quite happy with how it turned out and I even added a DIY Deer Scarer (ShiShi Odoshi), you can view that video also if it interests you.
How the pond looks after 1 Year
Below is a video showing how the pond looks after 1 year and in the video I talk about replacing the cheap pump and some splitting in the ShiShi Odoshi, other than that its been a perfect little pond and I’m glad I decided to give solar power a try.
I hope this post and the accompanying videos were helpful.