

If you’ve got fish in your pond, you’ve got waste — and if that waste isn’t handled properly, it builds up, turns toxic, and leaves you with murky water and sick fish.
The good news? You don’t need a fancy store-bought filter to fix it.
In this post, I’ll show you how to build three types of biological filters that work better than most commercial systems — and you can make them yourself for a fraction of the price.
What Is a Biological Filter?
A biological filter is simply a home for beneficial bacteria.
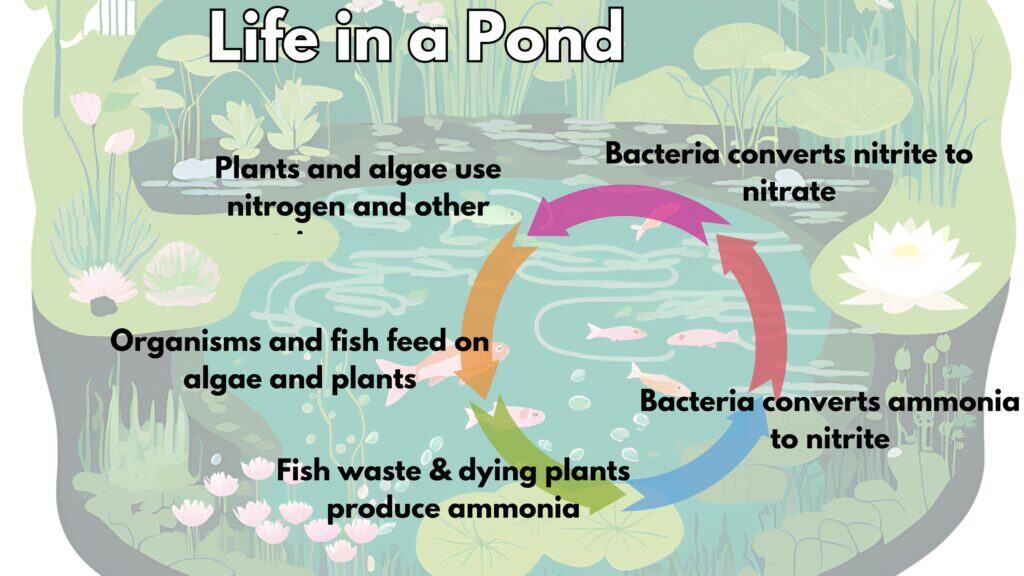
These bacteria convert toxic ammonia (from fish waste) into nitrite, then into nitrate — which is far less harmful and can even be used by your pond plants as fertiliser.
That’s what makes a pond “cycle.”
Without this biological process, ammonia and nitrite quickly become dangerous to fish.
💡 Mechanical vs Biological Filtration
Mechanical filters trap muck and debris.
Biological filters transform it — turning waste into plant food.
The best systems combine both: solids are trapped first, leaving clean, oxygen-rich water for bacteria to do their work.
1. The Bog Filter (Natural & Low Maintenance)
This is my personal favourite because it’s beautiful, simple, and works with nature.
A bog filter is essentially a shallow, gravel-filled wetland that your pond water is pumped through. Inside that gravel, bacteria thrive — and plants growing in the top layer help absorb nutrients and polish the water.
How big should it be?
It depends on what lives in your pond:
- Wildlife pond → 5% of pond surface area
- Goldfish pond → 10%
- Koi pond → 15–20%
- Ducks or turtles → 25% or more
You can size your bog filter and pump automatically using my Bog Filter Calculator, but as a rough guide, multiply the filter volume × 6 to get the pump flow rate you’ll need.
If you want to see some diagrams of different designs click here.
Building Tips:
- You can use a pond liner, a barrel, an IBC tote, a cut-down water tank — anything watertight.
- Always build with cleaning in mind. Add a flush valve or clean-out port at the base.
- Pump water into the bottom of the filter so it flows upward through coarse rock → fine pebble → plant roots.
- Plants like rushes, sedges, and water iris thrive here and soak up nutrients.
- Occasionally thin them out so they don’t choke the flow.
Bog filters are large, natural, and incredibly forgiving — they’re low-maintenance and perfect for DIY pond keepers who want clarity and a living water garden.
2. The High-Flow Barrel Filter (Compact & Customisable)
If you don’t have space for a bog, a container filter (often built from a barrel or bin) can give you excellent biological performance in a small footprint.
Here’s how it works:
- Pump water into the barrel.
- It hits sponges or filter mats first to trap solids.
- Then it flows through biomedia (like bio-balls, K1 media, or lava rock).
- Clean water exits back to the pond.


You can use bulkhead fittings or uniseals to make watertight connections — I use the same setup for my container bogs, and you’ll find links on my site if you’re not sure which to get.
Need more capacity?
Chain multiple barrels together:
- Barrel 1 → solids trap
- Barrel 2 → biomedia
- Barrel 3 → biomedia + aeration for maximum performance


Aerating the final barrel supercharges the bacteria, helping them process ammonia faster — perfect for koi ponds or heavily stocked systems.
Just remember: because there are no plants to absorb nitrate, you’ll need the occasional partial water change to prevent build-up.
3. The Trickle-Down (Shower) Filter
For serious fish keepers or compact setups, a trickle-down filter is hard to beat. It’s like a mini waterfall made of stacked trays filled with filter media.
How it works:
- Pump water to the top tray, which holds coarse sponges to catch muck.
- The water then cascades through layers of biomedia in trays below.
- As it falls, it becomes highly oxygenated — and bacteria work faster.
- Finally, it returns to the pond by gravity.


These filters shine in high-stock ponds (especially koi systems) where oxygen is key.
They do need more regular maintenance — rinse or replace sponges as needed (always in pond water, never tap water).
Filter Design Tweaks That Make Life Easier
- Pump protection: Use a pre-filter basket, intake bay, or wrap your pump in coarse sponge to stop solids before they reach your filter.
- Breather holes: If you’re pumping water into a sealed filter that drains by gravity, add a breather hole to prevent siphoning.
- Cleaning access: Add flush valves or clean-out ports so you can empty muck without dismantling the filter.
- Maintenance: Rinse sponges regularly, but go easy on biomedia — you don’t want to kill off your bacteria.
Tips for Success
✅ Surface area is king.
The more nooks and crannies your media has, the more bacteria can grow.
✅ Size your pump for the filter, not just the pond.
A mismatch can cause poor circulation and ammonia spikes.
✅ Use pond water for cleaning.
Chlorine in tap water kills beneficial bacteria instantly.
✅ Be patient.
New filters take time to “cycle.” Give it a few weeks before expecting perfect water clarity.
Common Mistakes to Avoid
🚫 Undersizing the filter.
🚫 Over-cleaning and wiping out bacteria colonies.
🚫 Poor design that leaves “dead spots” where water doesn’t flow.
Final Thoughts
Whether you build a natural bog, a compact barrel, or a high-performance trickle-down, the principles stay the same:
Trap the solids. Give bacteria a place to live. Return clean, oxygen-rich water to your pond.
Want to see these systems in action?
👉 Watch the full video on my Ozponds YouTube Channel
👉 Explore the step-by-step designs and formulas in my Pond Formulas Blueprint
And if you’ve built your own filter — bog, barrel, or trickle — share it via the contact page.
I’d love to feature it on the site to help inspire others.

About to build a pond… or already have one?
Sign up for my email list and I’ll send you DIY-friendly pond tips, along with a few helpful tools like calculators, gear recommendations, and more.