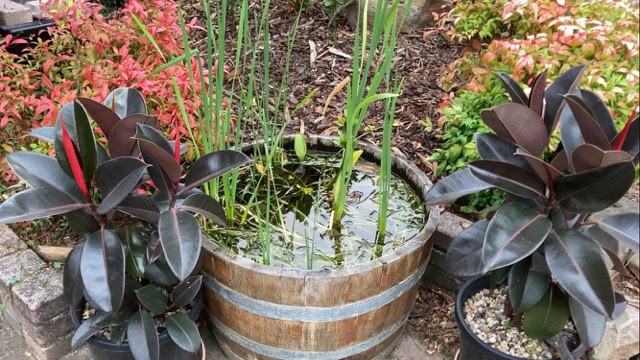
Building a pond can be a rewarding experience, offering a serene addition to your garden while supporting a small aquatic ecosystem.
In this guide, I’ll walk you through the steps to create a simple pond without a filter or pump, perfect for beginners. You can either read the article or watch the video below.
This pond is home to Pacific blue-eye fish, shrimp, and snails, and holds approximately 100 litres (25 gallons) of water.
Why Choose a Simple Pond?
As a beginner, starting with a smaller pond in a container can be less intimidating. Larger bodies of water are generally easier to maintain, but mastering a smaller scale pond can build your confidence and skills.
For this project, I used an old wine barrel, but you can use decorative pots or any other container that holds water. Ensure the container is watertight by filling it with water first. Old wine barrels may leak initially but will seal as the wood expands.
Steps to Create Your Pond
- Preparing the Container
- Fill the container with water to check for leaks. Once you confirm it’s watertight, drain the water.
- Add a thin layer of dirt, about 1 inch thick. This can be regular garden dirt, which you should wet down before adding.
- Cap the dirt with a 2-inch layer of sand. Any type of sand will work, such as pool sand, play sand, or fine aquarium gravel. The dirt provides nutrients for plants, while the sand traps these nutrients and prevents the soil from mixing with the water.
- Adding Plants
- Plants are crucial as they help filter the water. Use a mix of plants: some that root in the substrate, some that emerge from the water, and some that float on the surface.
- Here’s a list of plants I used:
- Thin eelgrass (roots into the substrate)
- Hornwort (submerged plant)
- Red leaf floaters (floats on the surface with roots dangling down into the water)
- You can also add plants from local water bodies if you’re sure they’re safe and suitable for your pond.
- Filling the Pond
- Gently fill the pond using an aquarium siphon to avoid disturbing the sand layer. I used old pond water, which is already rich in microorganisms.
- Initially, the water may be cloudy, but it will clear up in a few days.
- Adding Aquatic Life
- Let the pond sit for a couple of weeks to allow plants and microorganisms to establish before adding fish, shrimp, or snails.
- Avoid overstocking the pond. This particular pond has Pacific blue-eye fish, native shrimp, and common pond snails. Small fish like White Cloud Mountain Minnows and rice fish are also good choices.
Maintaining Your Pond
- Manual Cleaning
- Since there’s no filter, you’ll need to remove debris manually. It’s okay to let some organic matter settle, as it feeds plants and microorganisms.
- Position the pond to avoid direct sunlight for most of the day to prevent overheating and excessive algae growth.
- Feeding and Algae Control
- Don’t overfeed the fish; they’ll find natural food in the pond. Excess food can overwhelm the system.
- If algae become an issue, it’s often due to overfeeding or too much sunlight.
- Handling Rain and Overflow
- In areas with frequent rain, you might need an overflow system. Otherwise, simply let excess water cascade over the edges.
- In drier climates, a water change may be necessary to manage nitrogen levels. Siphon out 20% of the water and replace it weekly or bi-weekly.
Water Changes
- Using Tap Water: Treat it with a water conditioner (amazon link) to remove chlorine and chloramine.
- Using Rainwater: This is a pure alternative that doesn’t require treatment.
By following these steps, you can create and maintain a simple, no-filter, no-pump pond that is self-sustaining and easy to manage.
Check out my products page for helpful pond products and feel free to read lots more articles while your here.
Thanks for reading, and happy pond building!

